
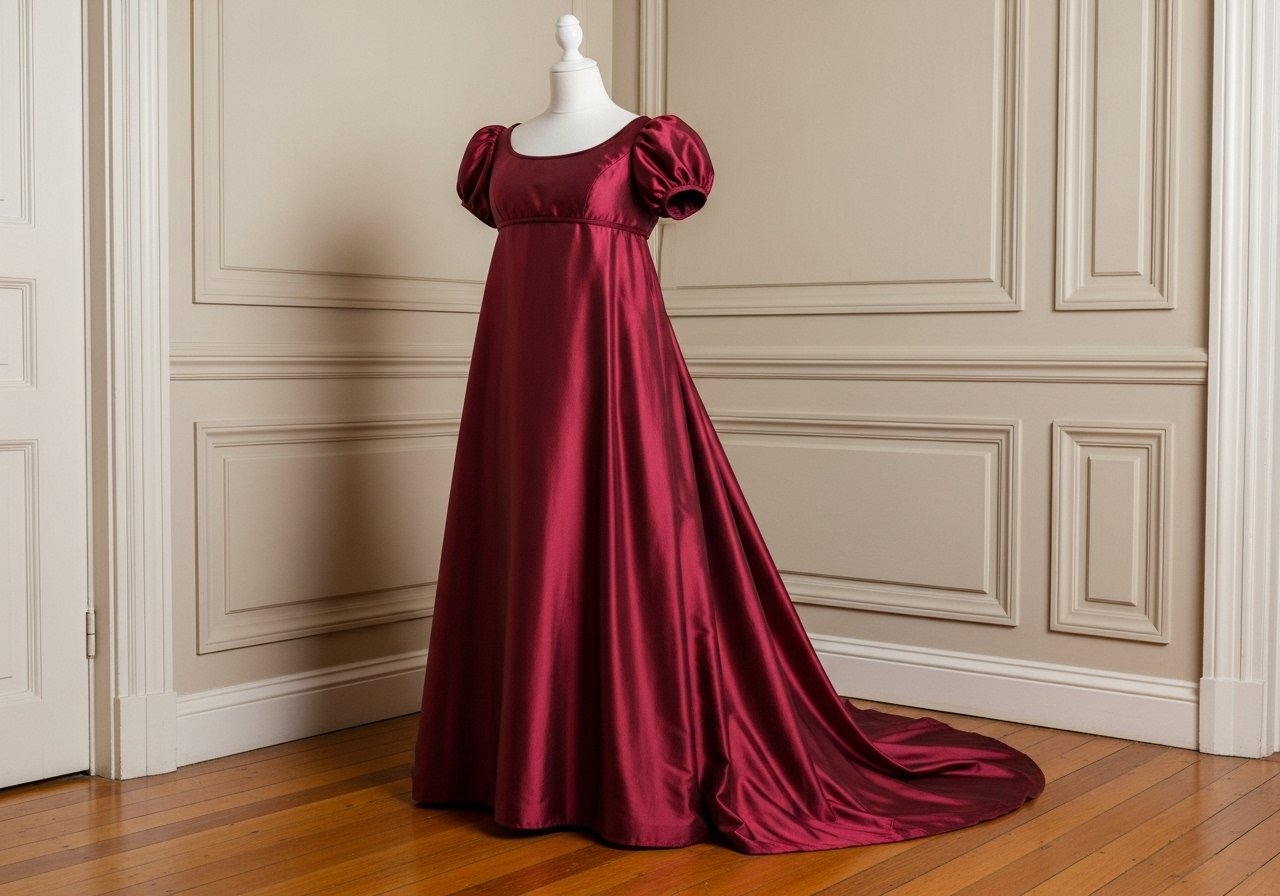
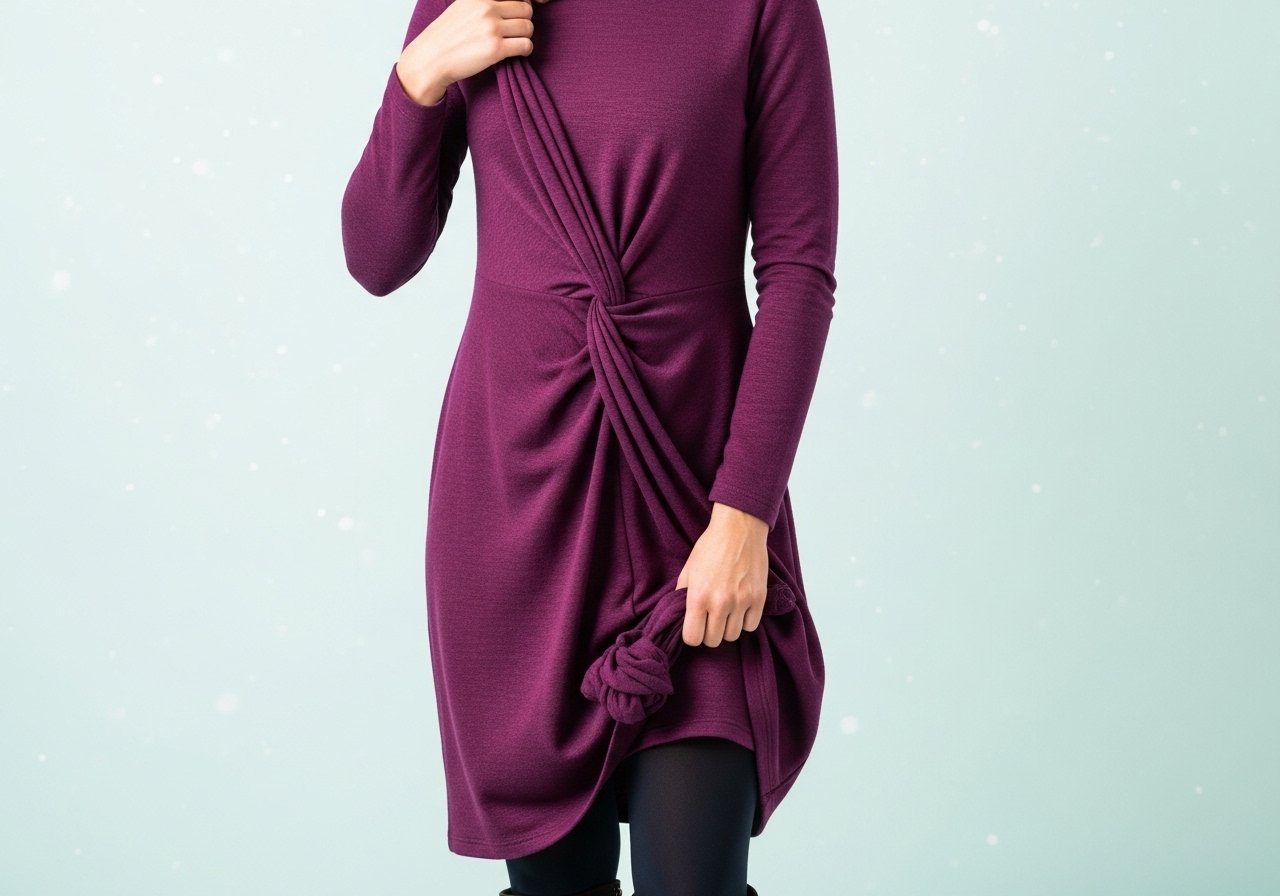
Wie man ein Kleid mit einem Empire-Knoten macht, ist ein bezauberndes Nähprojekt, das Eleganz und Individualität vereint. Ein Kleid mit Empire-Taille und einem dekorativen Knoten zu kreieren, ist einfacher, als man denkt, und das Ergebnis ist ein einzigartiges Kleidungsstück.
Dieses Projekt bietet die Möglichkeit, Kreativität auszuleben und ein Kleid zu gestalten, das perfekt auf die eigenen Maße und den persönlichen Stil zugeschnitten ist. Es ist ein erfüllendes Gefühl, ein Kleidungsstück selbst herzustellen, das nicht nur gut aussieht, sondern auch eine Geschichte erzählt.
Einfaches Nähprojekt für Anfänger und Fortgeschrittene, ideal für die schnelle Umsetzung eines neuen Lieblingskleides.
Das Empire-Design betont die Figur auf schmeichelhafte Weise und bietet hohen Tragekomfort.
Vielseitig einsetzbar: vom sommerlichen Freizeitlook bis zur eleganten Abendgarderobe, je nach Stoffwahl.
Durch den dekorativen Knoten entsteht ein einzigartiger Hingucker, der das Kleid von der Masse abhebt.
Materials for Wie man ein Kleid mit einem Empire-Knoten macht
Here’s what you’ll need to create this beautiful sewing project:
The complete materials list, including measurements, is provided in the project details below.
How to Sew Wie man ein Kleid mit einem Empire-Knoten macht
Follow these simple steps to create this beautiful sewing project:
Step 1: Schnittmuster erstellen oder anpassen
Entweder verwendest du ein gekauftes Schnittmuster für ein Kleid mit Empire-Taille oder du erstellst dein eigenes Schnittmuster. Miss deine Oberweite, Taille (direkt unterhalb der Brust) und die gewünschte Länge des Kleides. Übertrage diese Maße auf Schnittmusterpapier und zeichne die entsprechenden Schnittteile (Vorderteil, Rückenteil, eventuell Ärmel). Achte darauf, Nahtzugaben (ca. 1-1,5 cm) hinzuzufügen.
Step 2: Stoff zuschneiden
Lege den Stoff doppelt, sodass die rechte Stoffseite innen liegt. Platziere die Schnittteile auf dem Stoff und fixiere sie mit Stecknadeln. Zeichne die Umrisse der Schnittteile mit Schneiderkreide oder einem Markierstift auf den Stoff. Schneide die Stoffteile entlang der Markierungen aus.
Step 3: Obere Teile zusammennähen
Nähe die Schulternähte von Vorder- und Rückenteil zusammen. Versäubere die Nahtzugaben mit einem Zickzackstich oder einer Overlockmaschine, um ein Ausfransen zu verhindern. Bügle die Nahtzugaben auseinander.
Step 4: Rockteil vorbereiten
Falls dein Rockteil aus mehreren Teilen besteht, nähe diese zusammen, um den Rock in seiner vollen Weite zu erhalten. Versäubere auch hier die Nahtzugaben und bügle sie auseinander. Falls du einen gerafften Rock möchtest, nähe eine oder zwei Hilfsnähte am oberen Rand des Rockteils und ziehe die Fäden zusammen, bis die Weite des Rockteils der Weite des oberen Teils entspricht.
Step 5: Oberteil und Rockteil verbinden
Stecke das Oberteil und den Rockteil rechts auf rechts zusammen, wobei die Taille des Oberteils auf den oberen Rand des Rockteils trifft. Nähe die beiden Teile zusammen. Versäubere die Nahtzugabe und bügle sie nach oben. Falls du ein Gummiband in der Empire-Taille verwenden möchtest, nähe einen Tunnel für das Gummiband und ziehe das Gummiband ein.
Step 6: Knoten gestalten und befestigen
Für den dekorativen Knoten kannst du entweder einen separaten Stoffstreifen zuschneiden und ihn zu einem Knoten binden oder du verwendest einen Teil des Oberteils, um den Knoten zu formen. Fixiere den Knoten mit Stecknadeln und nähe ihn dann von Hand oder mit der Maschine fest.
Step 7: Säumen und Fertigstellen
Säume den unteren Rand des Kleides. Schlage den Stoffsaum zwei Mal nach innen um und nähe ihn fest. Nähe die Ärmel ein, falls du Ärmel vorgesehen hast. Bügle das gesamte Kleid sorgfältig, um ein professionelles Finish zu erzielen.
Herzlichen Glückwunsch, dein selbstgenähtes Kleid mit Empire-Knoten ist fertig!
Perfecting the Sewing Process
To achieve professional results, follow a structured sewing order. First, cut out all pattern pieces accurately. Then, sew the main seams like the bodice and skirt before attaching the empire waistline. Finally, add any decorative elements or finishing touches for a polished look.
Add Your Personal Touch
Make your garment uniquely yours by experimenting with different fabrics. Consider adding lace trim to the bodice or using contrasting fabrics for the skirt. You could also embellish it with beads, embroidery, or appliques to make it one-of-a-kind.
Caring for Your Creation
To keep your dress looking its best, hand wash it in cold water or use a delicate cycle in your washing machine. Avoid harsh detergents and tumble drying. Instead, hang it to dry or lay it flat to prevent stretching or shrinking.
Always pre-wash your fabric to prevent shrinkage after the dress is sewn; this step saves you from unwanted surprises later.
Use a walking foot, particularly when working with slippery fabrics like silk or rayon, to prevent shifting layers.
Press seams as you go; this creates a professional finish and makes subsequent steps easier to handle.
(Personal anecdote)
I remember the first time I sewed a dress like this for my niece. She wore it to her birthday party, and the joy on her face made all the effort worthwhile. Seeing her so happy was the best reward.
Choosing the Right Fabric
Selecting the right fabric is crucial for the success of any sewing project, and this is especially true when working on a dress with an empire waist. The fabric you choose will significantly impact the dress’s drape, comfort, and overall aesthetic. Think about the occasion for which the dress is intended. Is it a casual summer dress, or a more formal evening gown? Your choice of fabric should reflect the intended use.
Consider lightweight fabrics like cotton voile or linen for a breezy summer dress. These materials are breathable, comfortable, and easy to work with, making them excellent choices for beginners. For a more formal event, consider silk charmeuse or rayon challis. These fabrics have a beautiful drape and lend an elegant touch to the dress.
Also, think about the print and color of the fabric. A bold floral print can create a fun and playful dress, while a solid color can be more versatile and easier to accessorize. Ultimately, the best fabric is one that you love and feel confident working with.
Understanding Fabric Drape
Drape refers to how a fabric hangs and flows. A fabric with good drape will fall gracefully, creating soft folds and curves. Fabrics like silk, rayon, and chiffon have excellent drape, making them ideal for dresses with flowing skirts or intricate details. On the other hand, fabrics with poor drape, such as stiff cotton or heavy linen, will hold their shape more rigidly. They are better suited for structured garments like jackets or tailored skirts.
When selecting fabric for a dress, consider the desired silhouette. If you want a dress with a flowing, ethereal feel, opt for a fabric with good drape. If you prefer a more structured look, choose a fabric with more body.
Considering Fabric Weight
Fabric weight refers to how heavy the fabric feels. Lightweight fabrics are sheer and airy, while heavyweight fabrics are dense and substantial. The weight of the fabric will affect the comfort and durability of the garment. Lightweight fabrics are ideal for warm weather clothing because they are breathable and allow air to circulate. Heavyweight fabrics are better suited for cooler weather because they provide more insulation.
When choosing fabric for your sewing project, think about the season in which you will wear the garment. Lightweight fabrics are best for summer, while heavyweight fabrics are better for winter. Medium-weight fabrics are versatile and can be worn year-round.
Mastering the Empire Waistline
The empire waistline is a flattering design element that sits just below the bust, creating a long, flowing silhouette. This style is particularly flattering for various body types, as it accentuates the narrowest part of the torso and camouflages the hips and waist. Mastering the construction of this design is key to creating beautiful garments.
Accurate Measurements are Essential
Before you even begin cutting fabric, accurate measurements are crucial. Measure around your bust, just below the bust (where the empire waistline will sit), and the length you want your skirt to be. Use these measurements to select the correct pattern size or to adjust a pattern to fit your specific body. A well-fitting empire waistline depends on precise measurements.
Choosing the Right Pattern
Select a pattern that is specifically designed for an empire waist. These patterns account for the unique construction of this style and will ensure a better fit. If you are using a standard pattern, you may need to adjust it to create the empire waistline. There are many online resources and tutorials that can guide you through this process.
Sewing Techniques for a Perfect Fit
When sewing the bodice to the skirt at the empire waistline, take your time and pin the pieces together carefully. Use a sewing machine with a consistent stitch length, and sew slowly to ensure a smooth seam. Consider using a serger to finish the raw edges of the seam, preventing fraying and adding durability. Press the seam allowance upward towards the bodice to create a clean, professional finish.
Understanding Gathering and Ease
Often, the skirt portion of an empire waist dress is gathered or eased into the bodice. Gathering involves creating small, even folds in the fabric to reduce its width. Easing, on the other hand, involves slightly stretching one piece of fabric to fit another without creating visible folds. Both techniques require patience and practice. Experiment with different gathering and easing methods to find the one that works best for you.
Essential Sewing Tools and Equipment
Having the right tools and equipment is crucial for successful sewing. A well-equipped sewing space can make the process easier, more enjoyable, and ultimately, produce better results. Here’s a rundown of essential items every sewer should have.
A good sewing machine is the heart of any sewing space. Invest in a reliable machine with a variety of stitch options, including straight stitch, zigzag stitch, and buttonhole stitch. Consider features like adjustable stitch length and width, automatic needle threader, and a free arm for sewing cuffs and sleeves.
Sharp fabric scissors are essential for accurately cutting pattern pieces. Invest in a pair of high-quality scissors that are specifically designed for fabric. Avoid using them for paper or other materials, as this can dull the blades. A rotary cutter and cutting mat can also be helpful for cutting straight lines and curves.
A measuring tape is essential for taking accurate body measurements and measuring fabric. A clear ruler can be helpful for drawing straight lines and marking seam allowances. A seam gauge is a small ruler with a sliding marker that is used to measure hems and seam allowances accurately.
Pins are used to hold fabric pieces together before sewing. Choose fine pins that will not leave noticeable holes in the fabric. A pin cushion or magnetic pin holder will keep your pins organized and within easy reach.
A seam ripper is a small tool used to remove unwanted stitches. It is an essential tool for correcting mistakes and making alterations. A needle threader can be helpful for threading needles, especially for those with poor eyesight.
Ironing Equipment: Pressing for Perfection
An iron and ironing board are crucial for pressing seams and fabric. Pressing seams as you go creates a professional finish and makes subsequent steps easier. Choose an iron with adjustable temperature settings and a steam function. An ironing board with a padded surface provides a stable and comfortable surface for pressing.
Thread and Needles
Good quality thread is essential for strong and durable seams. Choose a thread that matches the color and weight of your fabric. Universal needles are suitable for most fabrics, but you may need to use specialized needles for delicate fabrics, heavy fabrics, or knit fabrics. Always use a fresh needle for each project to ensure smooth and even stitches.
Troubleshooting Common Sewing Issues
Even experienced sewers encounter problems from time to time. Knowing how to troubleshoot common sewing issues can save you time and frustration. Here are some common problems and their solutions.
Skipped stitches can occur when the needle is not properly inserted, the thread tension is incorrect, or the needle is damaged. Check that the needle is inserted correctly and that the thread is properly threaded through the machine. Adjust the thread tension and try using a new needle.
Bird’s nests of thread can occur when the thread is not properly threaded through the machine or the tension is too loose. Rethread the machine, making sure that the thread is properly seated in all the tension disks and guides. Adjust the tension and try again.
Uneven seams can occur when the fabric is not properly aligned or the presser foot pressure is too high. Use pins to hold the fabric pieces together securely. Reduce the presser foot pressure and try again.
Fabric puckering can occur when the thread tension is too tight or the fabric is being stretched while sewing. Loosen the thread tension and avoid stretching the fabric. Use a walking foot to help feed the fabric evenly through the machine.
Broken needles can occur when the needle is too thin for the fabric, the needle is bent, or the fabric is being forced through the machine. Use a needle that is appropriate for the fabric weight. Replace the needle if it is bent. Avoid forcing the fabric through the machine; let the machine feed the fabric naturally.
Advanced Sewing Techniques
Once you’ve mastered the basics, you can explore advanced sewing techniques to elevate your projects. These techniques add a professional touch and allow you to create more complex and intricate designs.
Working with Lining
Lining a garment provides a clean finish, adds durability, and improves the drape of the fabric. Choose a lining fabric that is lightweight and compatible with the main fabric. Common lining fabrics include silk, rayon, and acetate. Construct the lining separately from the main garment, then attach it at the neckline, armholes, and hemline.
Inserting Zippers
Inserting a zipper can seem daunting, but with practice, it becomes a manageable skill. There are several types of zippers, including standard zippers, invisible zippers, and separating zippers. Each type requires a different insertion technique. Use a zipper foot to sew close to the zipper teeth, and take your time to ensure a straight and even application.
Creating Darts and Tucks
Darts and tucks are used to shape fabric and create a more fitted silhouette. Darts are triangular wedges sewn into the fabric, while tucks are folds of fabric that are stitched down. Use darts to shape the bust, waist, and hips. Use tucks to add texture and detail to a garment.
Mastering Pattern Alterations
Learning how to alter patterns is essential for creating garments that fit your body perfectly. Common pattern alterations include adjusting the length of the bodice or skirt, widening or narrowing the shoulders, and adding or removing fullness. There are many online resources and tutorials that can guide you through the process of pattern alteration.
Further Inspiration and Learning Resources
There are countless resources available to help you continue learning and improving your sewing skills. From books and magazines to online tutorials and workshops, there’s something for everyone.
Consider joining a local sewing group or online forum. These communities provide a supportive environment where you can share your projects, ask questions, and learn from other sewers. Look for books and magazines that focus on sewing techniques, pattern design, and fabric selection. Subscribe to sewing blogs and newsletters to stay up-to-date on the latest trends and techniques.
Online resources like YouTube tutorials and online sewing courses can provide visual demonstrations and step-by-step instructions. Many fabric stores and sewing centers offer classes and workshops on a variety of sewing topics. Take advantage of these opportunities to learn new skills and techniques from experienced instructors.
Experiment with different fabrics, patterns, and techniques to find your own unique style. Don’t be afraid to make mistakes; mistakes are a valuable learning opportunity. Most importantly, have fun and enjoy the creative process!
Sharing Your Creations
One of the most rewarding aspects of sewing is sharing your creations with others. Whether you’re making gifts for friends and family or selling your garments online, there are many ways to showcase your talent.
Consider posting photos of your projects on social media platforms like Instagram and Pinterest. Use relevant hashtags to reach a wider audience, and engage with other sewers and makers. Create a blog or website to showcase your work and share your sewing tips and techniques.
Enter your garments in local sewing competitions and craft fairs. This is a great way to get feedback on your work and gain exposure. Offer your sewing services to friends, family, and neighbors. You can create custom garments, make alterations, or teach sewing lessons.
Start an online store on platforms like Etsy or Shopify to sell your handmade garments and accessories. This is a great way to turn your passion into a business. No matter how you choose to share your creations, remember to take pride in your work and celebrate your accomplishments.
Conclusion for Wie man ein Kleid mit einem Empire-Knoten macht :
Ein Kleid mit Empire-Knoten zu nähen ist ein lohnendes Projekt für Anfänger und Fortgeschrittene. Die Wahl des richtigen Stoffes und die Beherrschung grundlegender Näh-Techniken sind entscheidend für ein gelungenes Ergebnis. Achte auf eine sorgfältige Verarbeitung und passe das Kleid an deine Figur an. Mit den richtigen Tipps und Tricks kannst du dir ein wunderschönes, individuelles Kleid kreieren. Viel Spaß beim Nähen!
FAQs :
Was ist der Empire-Stil und warum ist er beliebt für Kleider?
Der Empire-Stil zeichnet sich durch eine hohe Taille direkt unter der Brust aus. Von dort fällt der Rock locker und fließend. Dieser Schnitt ist beliebt, weil er bequem ist und vielen Figurtypen schmeichelt. Er betont die Oberweite und kaschiert gleichzeitig Bauch und Hüften. Empire-Kleider sind oft eine gute Wahl für Schwangere oder alle, die sich ein bequemes und elegantes Kleid wünschen. Die hohe Taille sorgt für eine optische Streckung und verleiht eine anmutige Silhouette. Viele Designer verwenden diesen Schnitt, weil er so vielseitig ist.
Welche Stoffe eignen sich am besten für ein Kleid im Empire-Stil?
Die Stoffwahl hängt vom gewünschten Look ab. Leichte, fließende Stoffe wie Baumwollvoile, Leinen, Seide oder Chiffon sind ideal. Sie fallen schön und sorgen für einen femininen Look. Für ein festlicheres Kleid eignen sich Satin oder Taft. Anfänger sollten mit Baumwolle beginnen, da sie leicht zu verarbeiten ist. Berücksichtige auch den Tragekomfort und die Jahreszeit. Im Sommer sind atmungsaktive Stoffe wie Leinen oder Baumwolle angenehmer. Achte darauf, dass der Stoff gut fällt, um den Empire-Schnitt optimal zur Geltung zu bringen.
Welche Näh-Techniken sind für ein Kleid mit Empire-Knoten wichtig?
Für ein Kleid mit Empire-Knoten sind einige grundlegende Näh-Techniken wichtig. Sauberes Nähen von geraden Nähten ist essenziell. Auch das Versäubern der Stoffkanten, um Ausfransen zu verhindern, ist wichtig. Für den Empire-Bund solltest du Falten legen oder Kräuseln beherrschen. Das Einnähen von Reißverschlüssen oder Knöpfen kann ebenfalls erforderlich sein. Achte auf eine präzise Verarbeitung, besonders im Bereich des Empire-Bundes. Übe diese Techniken an Stoffresten, bevor du mit dem eigentlichen Kleid beginnst. So vermeidest du Fehler und sorgst für ein professionelles Ergebnis.
Wie kann ich das Kleid mit Empire-Knoten an meine Figur anpassen?
Ein Kleid mit Empire-Knoten lässt sich gut an die eigene Figur anpassen. Passe die Länge des Rocks an, um deine Beine zu betonen oder zu kaschieren. Die Weite des Empire-Bundes kann verändert werden, um eine optimale Passform zu erzielen. Füge Abnäher im Brustbereich hinzu, um das Kleid besser an die Körperform anzupassen. Spiele mit den Ärmeln – ob kurz, lang oder ganz ohne. Probiere das Kleid während des Nähens immer wieder an, um sicherzustellen, dass es perfekt sitzt. Kleine Anpassungen können einen großen Unterschied machen!