
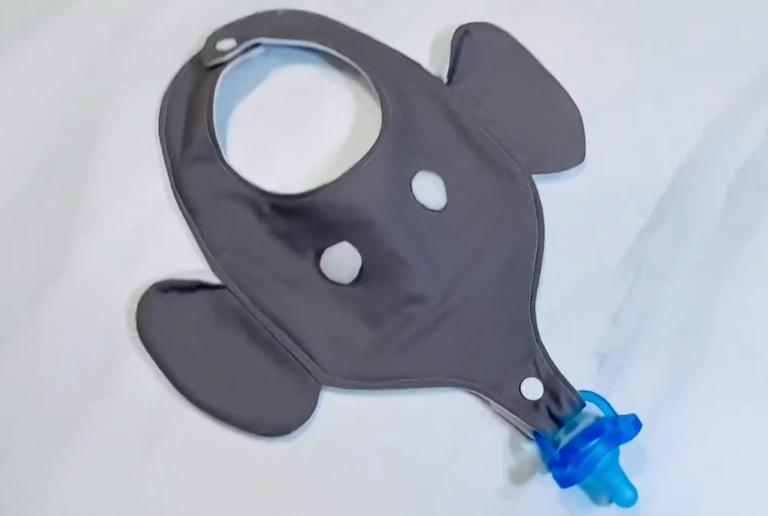
Creating handmade accessories for babies is not only a practical skill but also an incredibly heartwarming hobby. One of the most adorable and useful items you can sew is the Baby Elephant Binky Bib. This clever little creation combines the functionality of a drool bib with a pacifier holder and an irresistibly cute elephant design that babies love to snuggle. In this comprehensive DIY guide, you’ll learn how to sew a Baby Elephant Binky Bib from scratch. With four different pattern sizes, this project is suitable for newborns and toddlers alike. Whether you’re a beginner looking for a fun project or an experienced sewist seeking inspiration, this step-by-step guide will walk you through everything you need to know.
Why a Binky Bib?
Babies drool—a lot. And they lose pacifiers—a lot. The Baby Elephant Binky Bib solves both problems at once. It protects your baby’s clothes from drool while keeping the pacifier within reach and off the floor. The elephant-shaped bib adds a touch of charm, making it a delightful accessory for everyday wear or as a special handmade gift.
Materials You’ll Need
Before starting, gather the following materials:
- 100% cotton fabric (2 contrasting or matching prints for front and back)
- Soft flannel or absorbent terry cloth for lining
- Fusible interfacing (lightweight)
- Matching thread
- Plastic snap fasteners or Velcro (for bib closure)
- 1 small loop of elastic or a snap ribbon for attaching the pacifier
- Fabric marker or tailor’s chalk
- Sewing machine
- Iron and ironing board
- Scissors or rotary cutter
- Pins or sewing clips
- Optional: embroidery floss, felt for embellishments, stuffing for the elephant ears
Free Pattern Download
Visit fadenmagie to download the printable PDF pattern. The pattern includes four sizes:
- Newborn (0–3 months)
- Infant (3–6 months)
- Baby (6–12 months)
- Toddler (12–24 months) Each size has been carefully designed for comfort, coverage, and cuteness. The pattern includes seam allowances and placement lines for the pacifier loop.
Cutting Your Fabric
Once you’ve printed and assembled your pattern pieces, it’s time to cut your fabric.
- Cut 1 elephant bib front from your cotton print fabric
- Cut 1 elephant bib back from flannel or absorbent fabric
- Cut 1 elephant bib from fusible interfacing
- Cut 2 small ears from coordinating fabric or felt
- Cut 1 loop of elastic or ribbon (approx. 3 inches) Fuse the interfacing to the wrong side of the front cotton fabric for added structure.
Preparing the Elephant Ears
The elephant ears are what make this bib extra special. You can make them floppy, stuffed, or even add crinkle paper inside for sensory play.
- Sew the ear pieces right sides together, leaving the straight edge open
- Turn them right side out and press
- Optional: add a bit of stuffing or a layer of crinkle paper
- Topstitch around the curved edge for a neat finish
Assembling the Bib
- Position the elephant ears on the right side of the front bib piece. Align with the indicated ear placement lines on the pattern
- Baste the ears in place
- Fold your pacifier ribbon or elastic loop and place it where indicated at the elephant’s trunk. Baste it in place
- Place the bib back piece right sides together with the front, pin or clip in place
- Sew all the way around using a ¼” seam allowance, leaving a 2-inch gap at the bottom for turning
- Clip the curves, especially around the trunk and ears, to allow for smooth edges
- Turn the bib right side out through the gap. Use a chopstick or blunt tool to poke out the curves
- Press the bib flat
- Topstitch around the entire edge, closing the turning gap and reinforcing the structure
Adding the Closure
Attach your snap fastener or Velcro strip to the back of the bib neck tabs. Make sure it’s placed comfortably and securely. If using snaps, be sure to use a snap setter for a professional finish.
Customization Ideas
- Add embroidery: Stitch your baby’s name, a cute phrase like “Little Peanut,” or decorative stars
- Appliqué: Add a contrasting fabric shape like a heart or star to the elephant’s body
- Patchwork: Use leftover fabric scraps to create a colorful elephant design
- Color Blocking: Use different colors for the trunk, ears, and body
Care Instructions
The bib is machine washable and reusable, making it eco-friendly and budget-conscious. Wash on gentle cycle with baby-safe detergent. Tumble dry low or air dry to maintain shape.
Making a Set
Why stop at one? Create an entire elephant-themed set:
- Matching elephant plush toy
- Baby hat with elephant ears
- Elephant teething ring
- Soft burp cloths using the same fabrics Perfect for baby showers, gift baskets, or nursery sets.
Tips for Beginners
- Always pre-wash your fabric to prevent shrinkage
- Use plenty of pins or sewing clips to hold curves
- Go slowly around the trunk for clean stitching
- Practice the snap placement on a scrap piece first
Eco-Friendly and Sustainable
This project is ideal for upcycling leftover fabrics or old baby clothes. Use organic cotton or bamboo blends for an extra eco-conscious approach. Making your own baby gear not only reduces waste but also ensures safety and quality.
Selling Your Handmade Binky Bibs
These bibs are highly marketable at craft fairs or online stores. Make sure to follow safety guidelines (secure stitching, safe materials) and offer a variety of sizes and color palettes. Include washing instructions with each item. Consider bundling your bibs with matching accessories for added value.
Educational Benefits
If you’re teaching kids to sew, this project is a wonderful introduction to practical sewing. It involves simple curves, topstitching, and creative embellishment. Plus, it results in something useful and adorable they can gift or donate.
Gift-Worthy Presentation
Package your binky bibs with a handwritten tag, tied with twine or ribbon, and placed in a small kraft paper bag. Include a printed care card. This thoughtful presentation elevates your handmade item and makes it gift-ready.
Seasonal Designs
Make holiday-themed bibs with festive fabrics:
- Christmas elephants with Santa hats
- Valentine’s Day elephants with heart ears
- Easter elephants in pastel prints
- Summer elephants with sunglasses appliqué
Growing with Baby
Thanks to the four pattern sizes, this bib can grow with your child. Adjust the elastic length or ribbon loop for older babies who use different pacifier types. You can even modify the trunk area to hold small toys or teething rings.
Conclusion
Sewing your own Baby Elephant Binky Bibs is a heartwarming and practical DIY project that merges creativity with functionality. With just a few materials, basic sewing skills, and a bit of time, you can create something truly special that will be cherished by both babies and parents. Whether you’re sewing for your own family, as a gift, or for your handmade shop, this adorable elephant bib is sure to bring smiles and save pacifiers. Don’t forget to download your free pattern from fadenmagie and start stitching your way to the cutest binky bibs ever. Happy sewing!